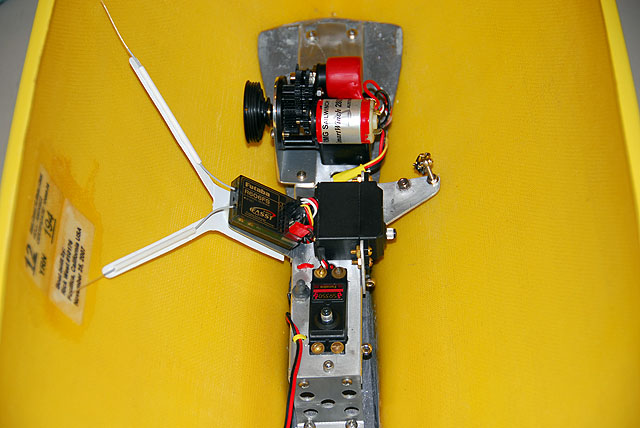
Systems Board

Home Up Electronic Checklist Support Equipment Hull Ballast Systems Board The Deck Sail Rigs Heavy Weather The Weight On The Water Maintenance

Batteries
The Chassis
Board Mount
Board Assembly
Sheetline System
Radio Equipment

Last update, December 16, 2007

Electronics and Sheetline System Board

An Integrated Installation


RMG winch Calibration - Crystal Radios Only


These sections is currently being revised and updated

Past building processes are in links below


Prior to 2006 there were many different ideas for the installation of the radio equipment in the boat from ballast mounted units to swing arm systems to the wooden board. Some of this has been retained in the links below. Some may like to continue to use the wood board that is shown in the EC12 Drawing. However, what has been developed and began use during 2007 was a radio mounting platform with the sheetline system fully installed sans connection to the booms. This system can be removed from the interior of the boat in one piece by removing one screw. This is a major convenience for maintenance, repair and refitting.


The design seen here is from R&D process from a prominent builder in northern Florida who has shared this with the Delta shop. We in turn share it with you.


This installation is based on an aluminum platform and work with this metal will be needed. It is not difficult and some special equipment will be needed. If you can bend aluminum or have someone do it, this is not advanced modeling. Those of you that would like to build in wood may certainly do so and it too will work. The link to the servo mounts will assist you in this preference.


This is the heart of the EC12. There is a lot of work to do here but when done you will be well on to finishing the floating part of the project. The Rig will be another matter.


The links to the left are for the module sections in building for preparation in the total assembly. For information on the radio to use, go to Radio Systems.


Previous Building

Original dates of posting are retained

Wooden E-Board     Servo Mounts

Rudder Servo     Jib Trim Servo     Twitcher Servo     RMG Sheetlines

RMG Winch Servo     E-Board Installation


Note: Winch programming will be revised shortly in the set up phase of the System Board. The advent of the Spread Spectrum radio system has changed the face of RC radio use. Basic programming is not needed. However, some information will be retained for those using the 26/27, 50 and 75mhz bands.

Winch Programming

The User Manual for the RMG SmartWinch covers the programming of the winch well enough, however, something interesting happens when you do it a lot. Although the manual lists around 7 steps in the process, actually there are closer to 19. Seven winches have been installed here and programmed. One would think that the procedure is perfected. Wrong! It is a fact that at times the mind will think it is doing something, or hearing something, because it is anticipated. But in fact it did not happen. Before you query Rob Guyatt about a bum winch try this checklist. Do so without mistake and you may be surprised at the result.


Please read the items in red. Additionally, there can be NO movement of the winch during the programming process. It is not uncommon for the radio system to allow small movements in the boat when the TX is close to the boat and rigging. Often this will allow the RMG to "Creep." You should be able to hear it move and if it does, stop the process and start all over. Remember, starting over means the TX and RX are OFF.


Battery Limit: It is highly recommended that the battery limit be turned off. This limit will (around 6.03 volts) move the sheets to a broad reach and LOCK the winch out. You will be able to get to the control area of shore but the heat is over for you. Turn this feature off.

When you get to step 18 and hear the three quick beeps from the winch advising you that it is programmed, DO NOT go to step 19. Proceed to step 21a and simply turn the TX on and quickly off. The winch will respond with three rising tones (Like a warble) telling you that the limit is OFF. THEN turn the boat power switch off and the winch is programmed.

Full Sheet Out: The 11 and 7.2 turn gearboxes may run the sheets out further than you like. Step 16 allows you to set it where you would like. Stopping the stick movement for your full out choice and turning off the TX in step 17 issues the instruction to the winch. Three beeps in step 18 is the winch telling you that it has set maximum rotation to your request. The next time you turn on the system and you move the stick to full sheet out, the winch will respond with only the number of turns set during the programming. Cool, huh?


Remember, you are instructing a simple software program within a simple processor. You need to be precise. Both checklists below are the same procedure. The first is a full printing that explains when and how the winch communicates. The second would be a handy printout for your tool box.


Sorry to be detailed but much is seen in the field that indicates recent users of this winch do not understand the process. There IS two-way communications with this winch. It is a remarkable piece of equipment.


For Crystal Radios Only

* RMG / TX Calibration *

* Winch Maximum Travel limits *

* Battery Use Limit *

If at anytime during this procedure, you do not get the right response from the winch, TX and winch off and start over at the beginning.

If at anytime during this procedure the winch responds with three rising tones (except 21b), TX and winch off and start over at the beginning.

1.       TX stick and trim close-hauled.

Note: Trim remains here throughout the procedure and during use.

2.       Turn winch on.

3.       After three quick beeps, TX on.

4.       Winch responds with one long beep.

It has noted the close hauled position

5.       TX off.

6.       Move stick to full sheet out.

7.       TX on.

8.       Winch responds with one long beep.

It has noted the MAXIMUM full sheet out position

9.       TX off.

10.   Winch responds with 3 quick beeps.

The winch is now calibrated to the TX stick for maximum turns and saved.

11.   Move stick to close-hauled.

12.   TX on.

13.   Winch will sheet in then respond with 2 quick beeps.

The winch acknowledges it has returned to where the stick is.

14.   Move stick to check for full sheet out travel.

15.   Move stick to check for full close-hauled travel.

You can do this several times if you like.

16.   When satisfied, move stick to the full sheet out position that you want for the sails. Check the travel again to make sure this is what you want. Leave the stick at YOUR full sheet out.

17.   TX off.

18.   Winch responds with 3 quick beeps.

The winch travel settings are now saved.

19.   Turn winch off…or leave it on for battery use limit options.

To enable the battery use limit…

20a. TX on.

20b. The winch will respond with 3 quick beeps.

The winch acknowledges you want a limit shutdown

The winch will now go to 1/2 sheet out and freeze whenever the voltages drops to about 6.03

20c. Turn winch off.

20d. TX off.

Done

To disable the battery use limit…

21a. Quickly turn TX on, then off.

21b. Winch responds with 3 rising tones.

The winch acknowledges you want NO limit shutdowns and will continue to operate till there is no power left in the battery

21c. Turn winch off.

Done


Toolbox size

* RMG / TX Calibration *

* Winch Maximum Travel limits *

* Battery Use Limit *

If at anytime during this procedure, you do not get the right response from the winch, TX and winch off and start over at the beginning.

If at anytime during this procedure the winch responds with three rising tones (except 21b), TX and winch off and start over at the beginning.

1.       TX stick and trim close-hauled.

Note: Trim remains here throughout the procedure and during use.

2.       Turn winch on.

3.       After three quick beeps, TX on.

4.       Winch responds with one long beep.

5.       TX off.

6.       Move stick to full sheet out.

7.       TX on.

8.       Winch responds with one long beep.

9.       TX off.

10.   Winch responds with 3 quick beeps.

11.   Move stick to close-hauled.

12.   TX on.

13.   Winch will sheet in then respond with 2 quick beeps.

14.   Move stick to check for full sheet out travel.

15.   Move stick to check for full close-hauled travel.

You can do this several times if you like.

16.   When satisfied, move stick to the full sheet out position that you want for the sails. Check the travel again to make sure this is what you want. Leave the stick at YOUR full sheet out.

17.   TX off.

18.   Winch responds with 3 quick beeps.

19.   Turn winch off…or leave it on for battery use limit options.

To enable the battery use limit…

20a. TX on.

20b. The winch will respond with 3 quick beeps.

The winch will now go to 1/2 sheet out and freeze whenever the voltages drops to about 6.03

20c. Turn winch off.

20d. TX off.

Done

To disable the battery use limit…

21a. Quickly turn TX on, then off.

21b. Winch responds with 3 rising tones.

21c. Turn winch off.

Done